Short Answer
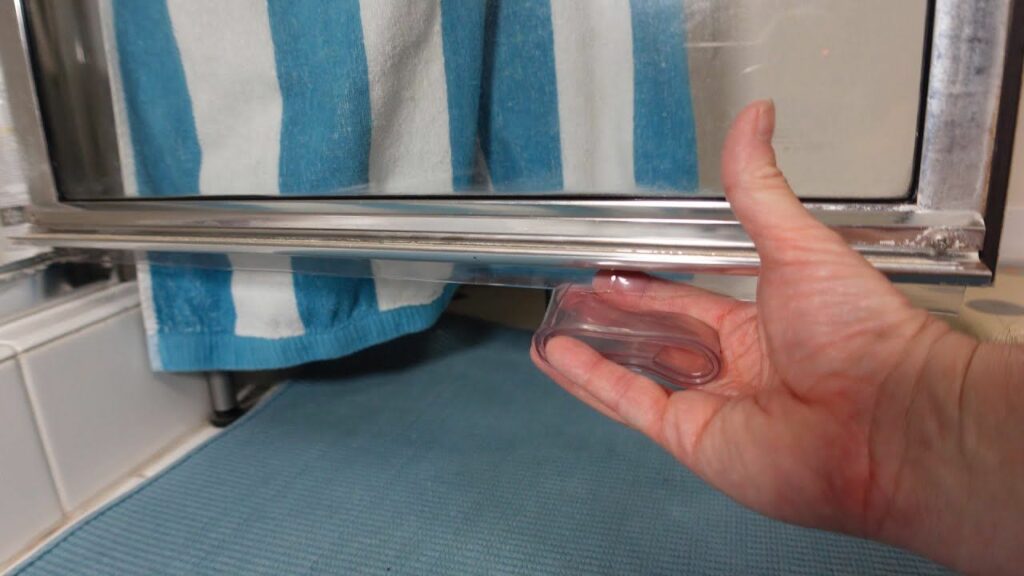
Shower doors serve not only as functional barriers to contain water within a bathing space but also as aesthetic elements that enhance the overall ambience of a bathroom. Over time, it is not uncommon for these fixtures to suffer from wear and tear, leading to the unfortunate yet prevalent issue of leaks. One of the primary culprits behind such leaks is a worn or damaged shower door seal. Addressing this commonplace annoyance through a DIY approach can be both fulfilling and cost-effective. This article provides a thorough and descriptive guide to replacing a seal on a shower door, allowing you to restore your shower’s functionality and enjoy a rejuvenated bathroom space.
Understanding the Importance of the Shower Door Seal
The shower door seal is typically made from materials such as rubber or silicone, creating a watertight barrier that prevents water from seeping out. A faulty or brittle seal can lead to persistent water damage on floors and walls, not to mention the mould and mildew that thrive in damp environments. By opting to replace a damaged seal, you are taking a proactive step to prevent long-term damage and maintain the integrity of not only the shower apparatus but the entire bathroom.
Gathering Materials and Tools
Before embarking on this endeavour, it is essential to gather all necessary materials and tools to ensure a seamless process. Here is a comprehensive list:
- New Seal: Ensure you purchase the correct type and size, available at most hardware stores.
- Utility Knife: A precise tool for cutting the old seal.
- Measuring Tape: For accurate measurements of the shower door.
- Cleaning Supplies: Mild detergent, sponge, and a cloth for surface preparation.
- Adhesive: Depending on the seal type, a suitable adhesive may be required for installation.
- Caulk Gun: If a caulking seal is chosen, a caulking gun will be necessary.
- Safety Gloves: To protect your hands during the process.
Step 1: Assessing the Existing Seal
Begin by closely inspecting the existing seal for any signs of damage. This may include cracks, brittleness, or mould growth. Observing these imperfections not only assists in determining the necessity for replacement but also helps in understanding how long the seal has been in place. Take note of the seal’s length and the specific profile design; these details will be crucial in acquiring the appropriate replacement.
Step 2: Removing the Old Seal
With your utility knife in hand and protective gloves worn, gently slice through the old seal along its length. Take great care during this process, aiming to avoid any scratches on the glass door or surrounding materials. If the seal is adhering stubbornly to the surface, you may need to apply a bit of force to detach it fully. Once removed, clean the area meticulously, ensuring that any remnants of the old adhesive have been eliminated. You want a clean slate for the new seal to adhere to, thus minimising the potential for leaks once the installation is complete.
Step 3: Measuring and Cutting the New Seal
Now, measure the length of the door to ascertain how much of the new seal is required. It is prudent to account for slight overages, as trimming can always be done post-installation. Using the utility knife, cut the new seal with precision following the measurements obtained. For optimal results, adhere to the manufacturer’s guidelines regarding installation and length adjustment.
Step 4: Installing the New Seal
With the new seal prepared, it is time for installation. If you are working with a seal that requires adhesive, apply a consistent line of adhesive along the edge of the shower door, taking care to avoid excessive application, which may ooze out during installation. If using a caulking type seal, load it into your caulking gun and apply evenly along the same edge.
Align the new seal with the edge of the door, pressing it firmly into place. It is vital to ensure that the seal is straight and even across the entire length. For caulking seals, smooth out the caulk line with a wet finger or a caulk smoothing tool for a neater finish. Allow the adhesive or caulk to cure fully according to the manufacturer’s instructions before subjecting it to the rigours of daily use.
Step 5: Final Inspection and Testing
Once the seal has been installed and allowed to set, it is time for a final inspection. Run your fingers along the new seal to ensure there are no gaps or misalignments. Next, turn on the shower and observe for any leaks. Pay careful attention to the areas where the new seal meets the door frame. If all appears well, congratulations—you have successfully replaced your shower door seal, extending its life and ensuring a water-tight finish.
Conclusion: The Rewards of DIY Maintenance
Replacing a seal on a shower door may seem a mundane chore; however, it embodies a broader narrative regarding home maintenance and personal investment in one’s living space. Engaging in hands-on repairs fosters confidence and instils a sense of accomplishment, while simultaneously safeguarding the aesthetics and functionality of your home. As the saying goes, a little effort today can lead to substantial peace of mind tomorrow.
FAQ
What materials do I need to replace a shower door seal?
You will need a new seal, utility knife, measuring tape, cleaning supplies, adhesive or caulk, a caulk gun, and safety gloves.
How do I know if my shower door seal needs to be replaced?
Signs include visible cracks, brittleness, or mould growth on the existing seal.
Can I install a new shower door seal myself?
Yes, the article provides a step-by-step guide for a DIY installation.
FAQ
What materials do I need to replace a shower door seal?
You will need a new seal, utility knife, measuring tape, cleaning supplies, adhesive or caulk, a caulk gun, and safety gloves.
How do I know if my shower door seal needs to be replaced?
Signs include visible cracks, brittleness, or mould growth on the existing seal.
Can I install a new shower door seal myself?
Yes, the article provides a step-by-step guide for a DIY installation.


Leave a Reply