Short Answer
When it comes to maintaining the integrity of your flat roof, laying felt is an essential task that can protect your home from the elements for years to come. Have you ever wondered if you could conquer the challenge of installing felt on your flat roof yourself? With the right guidance and preparation, DIY enthusiasts can achieve a professional finish. Yet the question remains: are you ready to tackle the technicalities and nuances of this DIY undertaking? In this comprehensive guide, we will explore the crucial steps involved in laying felt on a flat roof, discuss the necessary materials, and highlight pitfalls to avoid along the way.
Before delving into the practical aspects of the installation, it’s important to understand the fundamentals of the materials involved. Roofing felt, often referred to as bitumen felt or tar paper, serves as a waterproof barrier that protects your structure from moisture infiltration. Available in various types — including torch-on, self-adhesive, and cold-applied — each variant possesses its own unique application method and benefits. If you’re a novice, it might be tempting to opt for the simpler self-adhesive option, but consider the longevity and durability of the project when making your choice.
1. Gather Your Tools and Materials
Before embarking on this endeavour, proper preparation is paramount. Create a checklist of materials and tools you will need:
- Bitumen felt rolls
- Roofing adhesive or torching equipment (if using torch-on felt)
- Utility knife
- Straight edge
- Paint roller for adhesive
- Broom or vacuum to clean the surface
- Safety gear (gloves, goggles, etc.)
- Measuring tape
- Ladders or scaffolding for access
Organisation prevents unnecessary interruptions once you begin working, boosting your efficiency throughout the project.
2. Prepare the Surface
Taking the time to prepare your flat roof surface before installation will greatly enhance the adherence of the felt. First, inspect the roof for any damage or debris. Clear the roof of dirt, moss, or loose material that could hinder the proper sticking of the felt. Uneven surfaces can also pose challenges, so be vigilant in identifying and rectifying any imperfections.
If the roof has been previously covered with another material, ensure it’s in good condition. Any moisture from the underlying roof can compromise your new felt application, so be judicious about replacing unsuitable materials.
3. Measuring and Cutting the Felt
The next crucial step involves measuring your roof accurately. Use a measuring tape to determine the dimensions of your roof space and plan how many rolls of felt you’ll need. Typically, it is wise to allow for overlap between sheets, usually around 100-150mm, to ensure waterproofing efficacy.
Once you have your measurements, unroll the felt on a flat surface and use a utility knife to cut the rolls to size. Be mindful of the direction in which you will lay the felt, as it should always be aligned to shed water away from the roof edges.
4. Laying the Underlayer
For enhanced protection, it’s advisable to start with an underlayer of felt, especially on flat surfaces prone to standing water. Begin by applying adhesive to the roof surface using a paint roller, and then lay the underlayer felt smoothly, ensuring there are no wrinkles or bubbles. This step can be tedious but is essential for a long-lasting roof.
Secure the underlayer around the edges and within the body using roofing nails or fasteners. This will anchor it in place, allowing you to continue the process without disruptions.
5. Application of the Top Layer
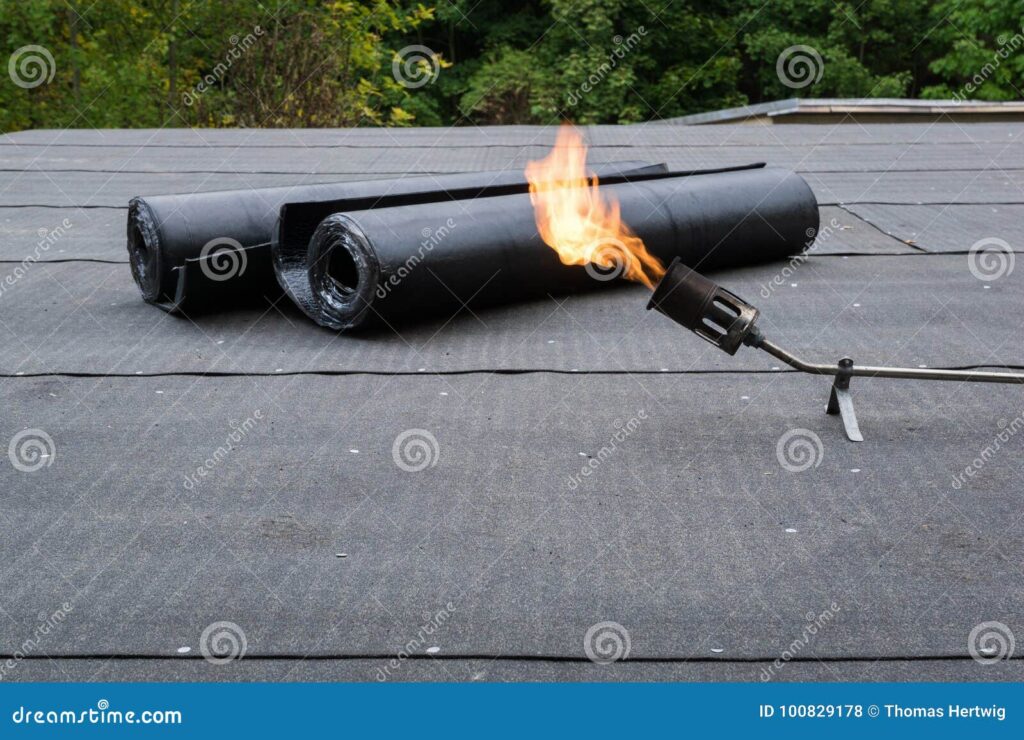
Now that your underlayer is securely in place, it’s time to apply the top layer of felt. If using torch-on felt, slowly apply heat with a gas torch to activate the adhesive as you roll it out. Be careful not to overheat and damage the material, nor set your roof ablaze! Ideally, you should work in one direction, starting from the edge and moving towards the apex of the roof.
If you’ve opted for a self-adhesive option, peel back the protective layer and carefully lay it down onto the prepared surface, smoothing out any bubbles or wrinkles as you go. Maintaining a level and professional appearance is key in both visual aesthetics and functionality.
6. Detailing and Finishing Touches
The detailing process can often feel like the project is nearing completion, yet meticulous attention here can make or break your installation. Ensure all seams are properly overlapped, and use adhesive as necessary to seal edges. Consider the areas around chimneys, ventilation, and parapets which may require additional attention to detail, ensuring absolute waterproofing.
Check for excess felt at the edges, trimming where necessary for a neat finish. After installation, leave your roof to cure, avoiding foot traffic for at least 24 hours to allow proper adhesion.
7. Regular Maintenance
Your newly installed felt roof will benefit immensely from regular inspections and maintenance. Check for any signs of wear, particularly after harsh weather, and address any issues promptly to extend the life of your roofing. Look for punctures, tears, or any areas where the felt may be lifting. Taking preventative measures now will save you time and money in the long run.
In conclusion, laying felt on a flat roof is a rewarding project that, when done carefully, can add years of protection to your home. While the task presents challenges, with proper preparation and respect for the materials, you can achieve results that rival professional installations. So roll up your sleeves, embrace the thrill of the DIY challenge, and embark on this transformative journey for your home! Good luck!
FAQ
What is roofing felt?
Roofing felt, often called bitumen felt or tar paper, is a waterproof barrier used to protect structures from moisture.
Can I install felt roofing myself?
Yes, with proper guidance and preparation, DIY enthusiasts can successfully install felt roofing.

Leave a Reply