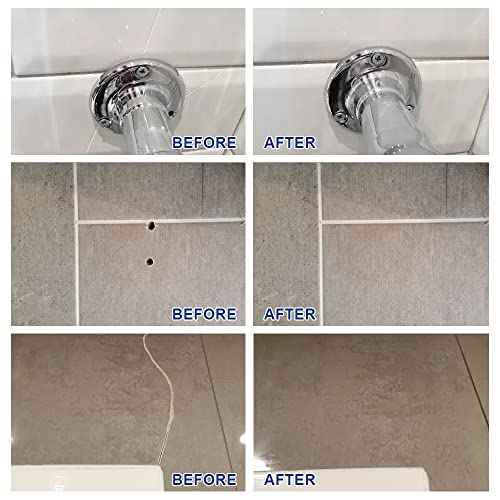
Short Answer
Cracked or chipped tiles can be an unsightly blemish in any home, detracting from the overall aesthetic while potentially causing further damage if left unattended. Fortunately, with the advent of epoxy tile repair kits, rectifying these imperfections has become an accessible and practical task for homeowners and DIY enthusiasts alike. In this article, we will explore the nuances of using an epoxy tile repair kit, detailing the process, features, and benefits that come with employing this innovative solution.
Understanding Epoxy Tile Repair Kits
Epoxy tile repair kits comprise a carefully formulated resin and hardener combination, designed to bond effectively with a variety of tile materials, including porcelain, ceramic, and even natural stone. When mixed, these components create a durable, water-resistant adhesive that hardens to form a solid bond, mimicking the appearance and texture of the original tile. The versatility of these kits makes them suitable for a range of repairs, from small chips to larger cracks.
Contents of an Epoxy Tile Repair Kit
Most epoxy tile repair kits include:
- Resin and Hardener: The primary components, which, when combined, initiate a chemical reaction resulting in a robust adhesive.
- Tinting Agents: These allow users to colour-match the repair compound to the original tile colour, ensuring a seamless finish.
- Application Tools: Often included are syringes, applicator brushes, or spatulas for precision when applying the epoxy.
- Surface Preparation Materials: Typically sandpaper or cleaning solutions ensure the tile surface is ready for adhesion.
- Instructions: Comprehensive guidelines that detail each step of the repair process, from preparation to finishing touches.
Preparing for the Repair
Before diving into the repair process, taking the necessary steps to prepare the work area and the tile surface is imperative. Start by cleaning the tile with a mild detergent to remove any dirt, oil, or debris that could impede adhesion. Once cleaned, examine the crack or chip thoroughly. If there are loose fragments, gently remove them. For larger chips, use sandpaper to smooth the edges, thereby creating a more even surface for the epoxy. This thorough preparation not only ensures a better bond but also enhances the final appearance of the repair.
Mixing the Epoxy
Once your surface is primed, the next step involves mixing the resin and hardener. Most kits come with specific ratios; however, it is paramount to follow the manufacturer’s instructions to achieve the best results. This mixture typically has a limited working time, so it is crucial to move efficiently. Consider engaging a timer to keep track, allowing you to focus on applying the epoxy without the pressure of rushing the task.
Application Process
With the epoxy blend prepared, you can begin applying it to the damaged area. Using the provided applicator, carefully inject the epoxy into the crack or chip, ensuring it fills the void completely. If you are working on a larger area, you may want to build up the epoxy in layers to avoid excessive overflow. For chips, applying the epoxy gently to the surface can help to recreate a disappeared fragment, blending seamlessly with the surrounding tile. It is advisable to overfill slightly as the epoxy shrinks during curing.
Finishing Touches
After applying the epoxy, allow it to cure as per the manufacturer’s guidelines. This period is crucial for ensuring that the bond achieves its full strength. Once cured, you can use fine sandpaper or a craft knife to gently smooth any unevenness or excess material. At this point, you might want to apply a tinting agent to match the original tile colour perfectly. This step enhances the visual integration of the repair, making it almost invisible to the naked eye.
Benefits of Using Epoxy Tile Repair Kits
The advantages of utilising epoxy tile repair kits are manifold:
- Cost-effective: Engaging a professional for tile repair can be exorbitant. A DIY approach with an epoxy kit is not only cheaper but also accessible.
- Time-efficient: Many repairs can be completed within a few hours, including drying time, making it a feasible weekend project.
- Durability: When properly applied, epoxy repairs are robust and can withstand everyday wear and tear, offering longevity that often surpasses traditional adhesive solutions.
- Aesthetically Pleasing: With the right colour matching, repairs can be virtually undetectable, ensuring that your tiles maintain their intended beauty.
- Versatility: Epoxy kits are appropriate for various tiles, making them an all-in-one solution for different flooring styles.
Final Thoughts
Repairing cracked or chipped tiles does not have to be a daunting task. With the right tools and a little patience, an epoxy tile repair kit can transform a less-than-perfect bathroom or kitchen into a rejuvenated space. The ease of use and effectiveness of these kits open avenues for homeowners to take control of their tile maintenance. Embrace the opportunity to restore your tiles and, by doing so, enhance the beauty and integrity of your home.
FAQ
What is an epoxy tile repair kit?
An epoxy tile repair kit is a DIY solution that includes resin and hardener to fix cracks and chips in tiles by creating a durable adhesive bond.
How do I prepare tiles for epoxy repair?
Clean the tile surface, remove loose fragments, and smooth edges with sandpaper to ensure proper adhesion before applying epoxy.
Can I use epoxy on different types of tiles?
Yes, epoxy tile repair kits are suitable for various tile materials, including porcelain, ceramic, and natural stone.


Leave a Reply