Short Answer
When starting out in the world of technical drawing, you might find yourself wondering: “What makes Third Angle Projection stand out from its cousin, First Angle Projection?” This playful question introduces a profound challenge for many budding designers and engineers who wish to master the intricacies of orthographic drawing. Let us embark on a journey to unravel the mysteries of Third Angle Projection, a favourite in British engineering practices, providing you with a comprehensive understanding of its significance, methodology, and application.
Understanding Orthographic Projection
Before delving into the specifics of Third Angle Projection, it’s crucial to appreciate the very essence of orthographic projection itself. This method allows designers to create two-dimensional representations of three-dimensional objects, effectively communicating dimensions and details without the distortion often found in perspective drawings. Imagine you’re attempting to depict a complex machine component; orthographic drawings will enable engineers and architects to envision every facet without ambiguity.
The Basics of Third Angle Projection
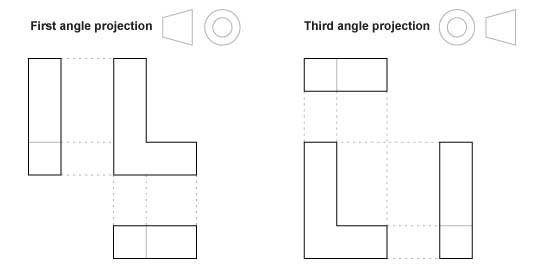
In Third Angle Projection, the object resides in the third quadrant of a three-dimensional coordinate system. The primary premise is that the object is viewed from the front, top, and right-hand side, with the views positioned relative to that perspective. An intriguing aspect of this projection method is the manner in which these views are arranged. The front view is central, while the top and right-side views are logically placed to show where they relate to the object. This arrangement may provoke a challenge: how do you ensure that each view corresponds accurately to the object depicted? The key lies in maintaining consistency and precision in measurements throughout each projection.
Materials Required for Orthographic Drawings
To create effective Third Angle Projection drawings, you will require several tools. A reliable set of drafting instruments is essential. The traditional pencil and ruler are invaluable for sketching out your ideas, while a technical drawing board allows for a stable working surface. The use of computer-aided design (CAD) software has also proliferated within the industry, enabling designers to create intricate and precise drawings with ease. The choice between manual and digital techniques presents itself as another challenge for beginners—should you rely on traditional methods or embrace the technological evolution of drafting?
Setting Up the Drawing
The establishment of your drawing can often set the tone for the entire project. Begin with a clean sheet of paper or a blank CAD file. Scale is of utmost importance: before initiating your drawing, decide whether to represent the object in full-size, half, or perhaps another scale that suits your needs. Drawing guidelines aid in maintaining readability; hence, light pencil lines or thin construction lines can serve as a foundation for outlining your views. The artistic interplay between precision and aesthetics begins to emerge here, challenging your ability to balance technical requirements with creative presentation.
The Views in Detail
In Third Angle Projection, each view must not only be clearly delineated but also harmoniously aligned. The front view sketches the object’s primary features and provides a robust foundation for the additional views. Herein lies a subtle complexity: the front view should capture essential elements without overwhelming the visual clarity. Once the front view is established, the top view is aligned directly above, representing how the object appears when viewed from above. Following this, the right-side view rests to the right of the front view. The meticulous task of ensuring concurrent dimensions across these views can present a formidable challenge, necessitating a firm grasp on spatial awareness and an understanding of the object’s geometry.
Dimensioning and Annotations
Dimensioning is indispensable for conveying precise measurements, thereby allowing the viewer to understand the scale of the object. Utilise appropriate symbols and units for clarity, staying consistent throughout your drawing. Annotations add another layer of information, guiding viewers as they navigate the drawing. Labels may indicate material specifics or assembly notes, transforming a basic drawing into a comprehensive instructional resource. Striking the perfect balance between a visually appealing layout and functional clarity is pivotal, and this balance can be a source of frustration for beginners.
The Final Touches: Revising and Presenting Your Work
Once the drawing is complete, the revision process commences. Scrutinise your work for inaccuracies or uncertainties that could obscure the intended message. This stage is a reflection on your design process—did your choices align with engineering principles? Did you communicate your ideas effectively? Beyond just a clean drawing, contributing to industries necessitates presenting your work in a professional manner, whether digitally or on paper. The act of articulating visual dynamics and technical concepts in a compelling way can be a thrilling expedition, rife with learning opportunities.
Conclusion: Embracing the Challenge
As you delve deeper into the realm of Third Angle Projection and orthographic drawing, remember that challenges abound. Each drawing is not merely a representation of an object; it is an exploration of geometry, precision, and communication. Each element, from alignment to dimensioning, presents a unique puzzle. The more you engage with these challenges, the more adept you will become. In the skilled hands of a designer, Third Angle Projection not only serves as a tool for representing objects but also stands as a bridge connecting imagination to reality. Are you ready to rise to the occasion and conquer the complexities of orthographic drawing?
FAQ
What is Third Angle Projection?
Third Angle Projection is a method of orthographic projection where the object is viewed from the front, top, and right side, arranged to show their relation to the object.
What materials are needed for orthographic drawing?
You will need drafting instruments, a drawing board, and optionally CAD software for creating orthographic drawings.
FAQ
What is Third Angle Projection?
Third Angle Projection is a method of orthographic projection where the object is viewed from the front, top, and right side, arranged to show their relation to the object.
What materials are needed for orthographic drawing?
You will need drafting instruments, a drawing board, and optionally CAD software for creating orthographic drawings.
FAQ
What is Third Angle Projection?
Third Angle Projection is a method of orthographic drawing where the object is viewed from the front, top, and right-hand side, with views arranged logically around the front view.
What tools are needed for orthographic drawings?
Essential tools include drafting instruments, a pencil, ruler, and optionally CAD software for more precise drawings.
How do you ensure accuracy in Third Angle Projection?
Maintaining consistency in measurements and ensuring views are aligned accurately to the front view are key for precision.
FAQ
What is Third Angle Projection?
Third Angle Projection is a method of orthographic drawing where the object is viewed from the front, top, and right-hand side, with views arranged logically around the front view.
What tools are needed for orthographic drawings?
Essential tools include drafting instruments, a pencil, ruler, and optionally CAD software for more precise drawings.
How do you ensure accuracy in Third Angle Projection?
Maintaining consistency in measurements and ensuring views are aligned accurately to the front view are key for precision.
FAQ
What is Third Angle Projection?
Third Angle Projection is a method of orthographic drawing where the object is viewed from the front, top, and right-hand side, with views arranged logically around the front view.
What tools are needed for orthographic drawings?
Essential tools include drafting instruments, a pencil, ruler, and optionally CAD software for more precise drawings.
How do you ensure accuracy in Third Angle Projection?
Maintaining consistency in measurements and ensuring views are aligned accurately to the front view are key for precision.
FAQ
What is Third Angle Projection?
Third Angle Projection is a method of orthographic drawing where views are arranged based on the object’s position in a three-dimensional coordinate system, allowing for accurate representation of dimensions.
How do I create an orthographic drawing?
To create an orthographic drawing, select a clean surface, scale your drawing appropriately, and ensure each view is accurately aligned and dimensioned.
FAQ
What is Third Angle Projection?
Third Angle Projection is a method of orthographic projection where the object is viewed from the front, top, and right side, with views arranged logically to represent the object accurately.
What materials do I need for orthographic drawings?
You will need drafting instruments, a technical drawing board, and optionally CAD software for creating precise drawings.
How do I dimension and annotate my drawings?
Dimensioning involves adding precise measurements to your drawings, while annotations provide additional information such as material specifics or assembly notes.

Leave a Reply