Short Answer
Wood stoves have long been the heart and hearth of many a home, their warm glow casting shadows that dance like fleeting memories against the walls. Yet, as time passes and seasons change, even the most steadfast wood stove can lose its allure, particularly when the glass elements begin to crack, cloud, or otherwise deteriorate. The good news is that replacing your wood stove glass isn’t just a task reserved for the professionals; with a little ingenuity and some DIY spirit, you can restore your fireplace’s charm, ensuring it continues to be a focal point of comfort and warmth. This guide will unveil some savvy hacks and strategies to transform your wood stove glass replacement experience into a seamless endeavour.
1. Understanding the Anatomy of Your Wood Stove
Before delving into the mechanics of replacement, it’s crucial to understand your wood stove’s anatomy. The glass used in these stoves isn’t ordinary; it often consists of tempered ceramic or heat-resistant glass designed to withstand high temperatures. This unique material should not be replaced with regular glass, as it would likely succumb to the intense heat and shatter. Familiarise yourself with the type and thickness of glass required for your stove, as this foundational knowledge will guide your next steps.
2. Assessing the Damage: Is a Replacement Necessary?
Not every imperfection requires an immediate replacement. Assess the damage with the discerning eye of a seasoned craftsman. Minor scratches or smudges can often be remedied with a gentle cleaning or polishing solution. However, if you identify cracks or significant clouding, your fireplace may be signalling for a more extensive restoration. Remember, a glass panel in disrepair can compromise both the aesthetics and safety of your stove, so don’t hesitate to act if it seems necessary.
3. Gathering Your Tools and Materials
Once you’ve confirmed that a replacement is in order, gather your toolkit. You will need: a screwdriver, appropriate replacement glass, a heat-resistant sealant, and a cloth for cleaning. Consider wearing gloves during this process; your hands may be the best tools you possess, but they are far more effective when safeguarded against sharp edges and heat!
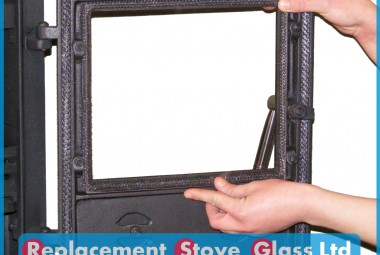
4. The Art of Removal: Extracting the Old Glass
Begin removing the old glass with the care of a delicate surgeon. Loosen the retaining clips or screws that hold the glass in place. As you gently lift the panel away, be prepared for the dust of bygone fires to swirl around you like the remnants of an ancient bonfire. If the glass resists, don’t force it; inspect your retaining mechanisms to ensure all are properly loosened. The goal here is a smooth extraction, allowing you to replace the old with the new without damage to the stove itself.
5. Cleaning the Frame: Preparing for Renewal
Once the old glass is removed, it’s time to reinvigorate the frame. Clean the edges meticulously; this pivotal step can be likened to preparing a canvas before painting. Using a wire brush or scraper, remove any residue from previous sealants or soot. This precursor to installation not only enhances the aesthetic appeal but ensures a proper seal for your new glass. A clean surface is the foundation upon which your future fires will dance.
6. Installing the New Glass: A Touch of Precision
Now, the moment has arrived—the installation of your new glass. Carefully place the replacement glass into the frame, aligning it perfectly with the existing slots. Employ a heat-resistant sealant to caulk the edges, ensuring a secure fit that can hold up against the fiery performance of your wood stove. Sealants act as guardians, preventing drafts from sneaking into your sanctuary and ensuring that your warmth is contained. Allow the sealant to cure according to the manufacturer’s recommendations before igniting your first fire—a necessary waiting period that ensures safety and effectiveness.
7. Testing Your Masterpiece: Light the Fire!
With the installation complete, it is time to breathe life into your restored wood stove. Before lighting the fire, conduct a visual inspection for any gaps or irregularities in the seal. If everything appears in order, gather your kindling and logs, feeling a surge of anticipation. When you light your stove for the first time, listen as it emits a satisfied crackle, ready to envelop your living space in warmth once again. This moment is akin to a crescendo in a symphony, where all your efforts harmoniously culminate in the resplendent glow of your hard work.
8. Embracing Maintenance: The Key to Longevity
As with any cherished item, regular maintenance will prolong the life of your wood stove glass. Clean it regularly with a solution appropriate for high temperatures, keeping smudges at bay and allowing you to enjoy the full splendour of your fire. By staying vigilant and performing routine checks, your stove will remain a beacon of warmth and beauty, continuing to mesmerise family and friends alike.
In conclusion, the process of wood stove glass replacement is not merely a chore; it is an invitation to engage creatively with your living space. By wielding a screwdriver instead of a paintbrush, you can transform your stove from a neglected relic into a vibrant source of warmth and joy, emanating a glow reminiscent of the evening sun setting over tranquil hills. Embrace these DIY hacks, and let the fire in your wood stove burn brightly once more.
FAQ
What type of glass should be used for wood stove replacement?
Heat-resistant tempered ceramic glass is required to withstand high temperatures.
Is it safe to replace wood stove glass on my own?
Yes, if proper precautions and tools are used, and the sealant is allowed to cure fully.
How often should wood stove glass be maintained?
Regular cleaning and periodic inspections after every heating season or as needed.
What should I do if the glass cracks during use?
Replace the glass immediately to avoid safety hazards and loss of stove efficiency.


Leave a Reply